Showing posts with label Industrial/plumbing pipe desk. Show all posts

Friday, June 27, 2014

!($&#*#*$&%!*#@!!

Shit.  I don't want 48-inch of separation; I want 48 inches between the flanges.  The flanges add another 2 inches, so I wanted a 46-inch separation, which means the pipe should have been cut at 42 inches.  Crap.  I wonder if they well recut the pipe.

To their credit, Lowe's re-cut all the threads for free.  We tested the threads using 2 connectors {an end cap and a coupling} to make sure they worked this time.  Next time, I am going to test the threads as the pipe is cut so I don't have to make 3 trips!

The pictures on the page appear smaller than they are.  To see them larger, simply double click on the picture.  Also, I always welcome your constructive criticism.  Click on the Comment link below next to the icon of a pencil; it may say "No" or have a number in front of it.

A few tips on custom-cut pipe

1)  Whereas shorter black iron pipe is usually coated with oil, longer sections {anything over 12 inches} are coated with black paint.  The pipes I bought at Lowe's even had information printed on top of the paint.

2)  While cleaning off the printing and the price sticker glue using rubbing alcohol, the black paint also came off.

3)  Having pipe custom cut and threaded will leave sharp burrs on the end of the pipe.  You may wish to have a metal file available to take these down.

4)  Pipe, at least at Lowe's, cannot be threaded in custom sizes less than 12 inches; so I cannot plan on any 11½-inch pipes.  I either use what the store has precut or go for something longer than 12 inches.

I always welcome your constructive criticism.  Click on the Comment link below next to the icon of a pencil; it may say "No" or have a number in front of it.

Floor flange search

Unfortunately, my local Lowe's does not carry black iron floor flanges, which I need for my various projects.  Therefore, I went out to the internet.  Prices vary greatly for some of these items.  I have seen ½-inch floor flanges for under $2 and over $10.  Some of the decision has to come down to certain non-monetary criteria.

While looking at the flanges available through Home Depot's website, a customer complained that he thought he was ordering a specific brand and was instead given a Chinese knockoff.  I have also read some articles on line {so they have to be true, right? :::wink, wink:::} that Chinese flanges have less accurate threads.  Also, my brother, the former gang member, would kill me if the parts weren't made in the U.S.A.  My search took me to a company called MSC Direct.

MSC Direct isn't the least expensive place to get flanges; they are better than some and worse than others.  After shipping costs, however, the price per flange will still be less than what I paid for the galvanized flanges I used in testing.  Their flanges are also made in the U.S.A., so that is a plus.  Finally, they gave me good customer service via email, and I tend to pay more at a company with good customer service.  {That reminds me, I have to switch banks.}

I will be placing a flange order with them later tonight.  This means I am pretty much dedicated to making at least the plumbing pipe furniture that needs the flanges.

I always welcome your constructive criticism.  Click on the Comment link below next to the icon of a pencil; it may say "No" or have a number in front of it.

Monday, June 23, 2014

Recalculating the supports

Now that I have my legs designed and measured, I decided to recalculate the side and back support pipes.

I assembled two flange, 6-inch pipe, and T sections and set them on a yardstick 24 inches apart.  I measured from the outside edges of the Ts and got 22 inches.  Next, I put together a T, a 6-inch pipe, and a T and measured the outside edges of the Ts.  This resulted in 10 inches, which I confirmed on both the yardstick and using the combination square.  Therefore, 10 inches apart minus 4 inches equates to a 6-inch pipe.  Mathematically, to get a result of 22, the equation becomes 22 - 4 = pipe.  Subtract the 4, and the result is 18 inches of pipe.  My pipe needs to be 18 inches for a 24-inch deep top.

Using the same equation, then, if I desire a 48-inch separation {the width of the workbench}, the equation is 48 - 4 = pipe, or 44 inches.

As 18-inch pipes exist, I do not necessarily need them custom cut.  However, I do have leftovers at the end of each 120-inch length of custom-cut pipe.  For the 120-inch pipe, I currently have 44 + 22½ + 22½ = 99, leaving 21 inches of pipe; so an 18-inch piece could be made.  For the other custom-cut pipe, I am currently at 25⅞ + 25⅞ = 51¾.  There is a 60-inch pipe available for $18.18, but the 72-inch pipe is only $18.97.  For only 70¢ more, I get an 18-inch pipe that sells for $8.89.

I guess a trip to Lowe's is in order.

I always welcome your constructive criticism.  Click on the Comment link below next to the icon of a pencil; it may say "No" or have a number in front of it.

Left legs

Now that I have decided not to add shelving to my desk, creating the left legs is merely a repeat of the right front leg and right rear leg designs.

Based on those plans, then, I need to acquire 2 of each of the custom pipe lengths.  Adding them all together {(2 x 22½) + (2 x 25⅞)} results in 96¾ inches, leaving 23¼ inches of pipe remaining.  Unfortunately, I also need a 44⅛-inch custom-cut pipe.  If I go ahead with these cuts, I need to have something planned for the leftover pipe sections.  Looks like I will have to design the shelves now before I can order the desk pieces.

I always welcome your constructive criticism.  Click on the Comment link below next to the icon of a pencil; it may say "No" or have a number in front of it.

Another design idea change

While looking around for drawers to add to my industrial/plumbing pipe desk/workbench, I came across this on the Ikea website.
So I thought “Why complicate a nice simple design when I can simply create a small shelf unit to fit under the workbench?”  After all, I have no idea what is going to be put on the shelves.  Having a separate unit will allow me to redo the shelves as often as necessary, so this type of thing is really the best way to go.

The pictures on the page appear smaller than they are.  To see them larger, simply double click on the picture.  Also, I always welcome your constructive criticism.  Click on the Comment link below next to the icon of a pencil; it may say "No" or have a number in front of it.

Friday, June 20, 2014

Shelf support

The shelf support will consist of a T, a pipe, and an elbow.  The T will be aligned with the flange above, so I need to take the flange diameter into account.  Placing all of these pieces on a ruler.  With a 6-inch pipe, the assemblage came to 11⅞ inches, so this gives me the maximum shelf width for a 6-inch pipe.

The question now, then, becomes whether a 12-inch-deep shelf is enough.  If I use a 16-inch-deep shelf, my leg room diminishes from ≈33 inches to ≈29 inches.  According to the Brezlin Custom Furniture website, the chair space should be “20 to 26 inches high, no less than 20 to 24 inches wide, and 12 to 15 inches deep.”  Therefore, my 29 inches exceeds expectations.

Now I have to figure out how to calculate height between the shelves.  Because of the multiple T connections being used, this could prove problematic.

I always welcome your constructive criticism.  Click on the Comment link below next to the icon of a pencil; it may say "No" or have a number in front of it.

Right rear leg

The right rear leg will consist of an end cap, a 6-inch pipe, a T, a close, and another T.  This assemblage measures in at 12⅞ inches. I want 35-inch-long legs {a 1-inch-thick board will put my workbench at 36 inches off the ground}.  Mathematically, then, was have 35 - 12⅞ - ¼ {flange addition to length} = 22⅛ + ⅜ {loss of thread in T} = 22½ inches of pipe.  Therefore, my custom-cut pipe list needs to include one 22½-inch pipe.

I always welcome your constructive criticism.  Click on the Comment link below next to the icon of a pencil; it may say "No" or have a number in front of it.

Tool tips

A couple of tool tips if you decide to follow in my footsteps and build a plumbing pipe desk.

Get a combination square.  This tool will allow you to measure pipe assemblages, like this:
Try to find one that has a long ruler.  I discovered 12 inches is not long enough.

If you are going to do pipe through shelving, like I am, you will also need a hole bit for your electric drill.  There are two kinds of bits:  paddle and saw.  I prefer the saw bit because it should theoretically go through straighter.  The paddle bit could go out of alignment.

The pictures on the page appear smaller than they are.  To see them larger, simply double click on the picture.  Also, I always welcome your constructive criticism.  Click on the Comment link below next to the icon of a pencil; it may say "No" or have a number in front of it.

I hate measuring

I hate measuring.

I was just at the Lowe's to buy some pipe and check out shelving for my industrial/plumbing pipe desk/workbench.  Well, it seems that they can't measure any better than I can.  Some of the shelving was off by as much as ¼ inch.  This makes it difficult to do accurate planning.  I may have to switch my method of construction from bottom up to top down and buy the top first rather than get the legs ready.

I hate measuring.

The pictures on the page appear smaller than they are.  To see them larger, simply double click on the picture.  Also, I always welcome your constructive criticism.  Click on the Comment link below next to the icon of a pencil; it may say "No" or have a number in front of it.

Wednesday, June 18, 2014

Right front leg

The right front leg will be the easiest piece to calculate and assemble.  Based on my designs, I need an end cap, a 6-inch pipe, and a T {all of which I currently have}.  Using my square to measure, that comes out at a hair short of 9¼ inches.  I used the same device to measure a 6-inch pipe in a flange.  That measured 6¼ inches.  The flange added ¼ inch of length, so I need to subtract ¼ inch from the length of pipe.

I want 35-inch-long legs {a 1-inch-thick board will put my workbench at 36 inches off the ground}.  Mathematically, then, was have 35 - 9¼ - ¼ = 25½ + ⅜ {loss of thread in T} = 25⅞ inches of pipe.  Therefore, my custom-cut pipe list needs to include one 25⅞-inch pipe.

I always welcome your constructive criticism.  Click on the Comment link below next to the icon of a pencil; it may say "No" or have a number in front of it.

Failure of measurements

As it turns out, trying to design plumbing pipe furniture using measurements is futile for someone with borderline OCD, like me.  I measure pipes and add them together, but they do not piece together at that measurement.  I try to use Photoshop with the grid turned on, but the errors are even more noticeable.  I am going to have to simply use my best approximations, which I never like doing.  After all, I can always loosen one joint a partial turn to get everything the same length.

I always welcome your constructive criticism.  Click on the Comment link below next to the icon of a pencil; it may say "No" or have a number in front of it.

Thoughts on Kee Klamp fittings

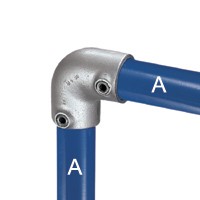
Those of you who have searched the Internet for industrial/plumbing pipe guides may have come across something known as Kee Klamps.  Kee Klamps are pipe fittings that use a presser screw to hold pipes in place rather than a threaded connection.  Maybe the picture below will explain it better.
Instead of a threaded socket, those two Allen-type screws are tightened to hold the pipes in place.  There are two major benefits to this type of connector.  The first is a wider variety of configurations.  One can layer and criss-cross pipes with Kee Klamps in ways that one can't with regular plumbing pipes.  The other advantage is no need for unions.  Whenever a plumbing pipe design forms a closed loop, such as a square or rectangle, a union is needed because one can't screw a pipe in at both ends at the same time.
As you could see if I hadn't drawn over it, this bookshelf is a closed loop and, hence, requires a union.  The hex nut inside the green circle is a union.  A union has 3 different threaded hex nuts.  The 2 on the outsides spin in different directions so pipes can be joined.  The middle hex holds the other 2 pieces in place.  A union is not necessary when using Kee Klamps.

There are two major disadvantages of Kee Klamps that I perceive, the first being that the pipes are held together with just a small screw rather than a large thread path.  This theoretically should have less holding power, although people have built parkour structures using Kee Klamps.  The second drawback is cost.  A 90° elbow of 1-inch threaded pipe costs $3.60 at Lowe's; the same size elbow to buy on-line costs $10.86.  This brings up the inconvenience of on-line ordering versus picking something up locally as well as the potential added cost of shipping.

All these things being said, I am currently not sold on the idea of using Kee Klamps instead of standard plumbing joints.

The pictures on the page appear smaller than they are.  To see them larger, simply double click on the picture.  Also, I always welcome your constructive criticism.  Click on the Comment link below next to the icon of a pencil; it may say "No" or have a number in front of it.

References:
"15 - 90° Elbow." Simplified Building. Simplified Building Concepts, 2010. Web. 18 June 2014.

"Parkour Structure at Miami Freerunning and Parkour Academy." Simplified Building. Simplified Building Concepts, 2010. Web. 18 June 2014.

Monday, June 16, 2014

More thoughts on re-design

While searching for parts to start making this industrial/plumbing pipe desk/workbench, I keep coming across more ideas I want to incorporate into the design.  Most of these come from a Pintrest site called Simplified Building.
This photo shows a pipe desk with the support across the back instead of the bottom.  I like this idea because the pipe will not interfere with any type of chair.
The desk in this picture has floating shelves underneath.  This could solve my drawer idea problem.  I simply need to put in a center drawer glide on the bottom of a drawer to use the floating shelf as a drawer frame.  Also, the desk is 58 inches wide.  As my desk will only be 48 inches, I will only put floating shelves on the left-hand side.
And I cannot think of a better chair for my desk than this one.  I was able to track it down to houzz.com, where it is available for $115 including shipping.  They also have a leather version for $150.  Both stools are adjustable to a height of 26¼-33¼ inches.  This raises another design question.

How high does my workbench need to be to accommodate the stool?  Firstly, how high should a workbench be in the first place?  According to Woodsmith eTips, it should be “the distance from the floor to the crease on the inside of your wrist.”  That turned out to be a little hard to measure; I got anywhere from 31-35 inches until I relaxed my body and was more aware of spine alignment, after which I consistently got 33½ inches on my left and 34 inches on my right.  Hence, the top of my workbench will be 34 inches off the ground.  What height for a stool, then?  According to B4U Designs®, “A good rule of thumb is there should be between 9 and 13 inches between the seat height and the height of the counter or table where the chair or stool is going to be used.”  They even have this little graphic to help explain.
Putting these measurements together, I get a 34-inch workbench height with a 25- to 21-inch stool.  That means the stool I want, at 26¼ inches, is too high for the workbench.  Now, do I go with a 36-inch-high workbench to get the chair I want, or do I keep it at 34 inches to have the highest degree of potential comfort?  Considering I have never had discomfort with my 37-inch-high workbench {even when using a 24-inch-high barstool} and a pipe desk would lend itself to changes in height simply by changing the length of a few pipes, I see no reason to lower the height of my workbench.

With dimensions {36 inches high x 24 inches deep x 48 inches wide}, shelving options (floating shelves underneath with wrap-around “closet” shelving}, and basic structure {support pipe behind} all decided, it is time to redo all my measurement calculations.

The pictures on the page appear smaller than they are.  To see them larger, simply double click on the picture.  Also, I always welcome your constructive criticism.  Click on the Comment link below next to the icon of a pencil; it may say “No” or have a number in front of it.

References:
"Bar Stool Buying Guide." B4U Designs®. Fitness Equipment Mfg. Inc., n.d. Web. 16 June 2014.

weareMFEO. "Industrial Desk // Rustic Table // Reclaimed Barn Wood // Aged Steel Pipe." Etsy. Etsy, Inc., 14 June 2014. Web. 16 June 2014.

"Workbench Height." Woodsmith eTips. August Home Publishing Company, 12 June 2014. Web. 16 June 2014.

Sunday, June 15, 2014

New inspirations!

Just came across a few more plumbing pipe designs that I may wish to incorporate into the desk/workbench idea.
I found this on a Pintrest page.  It is described as a closet, but I am thinking about making it a rail system that goes over my workbench.  The legs in the picture background could actually sit on my desktop rather than the floor, and I can set up the shelves in the picture foreground as the additional 2 feet of desktop space.  I can even employ this idea . . .
. . . {also from a Pintrest page} as a steampunk/industrial file cabinet system.  I would hang folders instead of record covers.  {Just put metal skirt hangers on my Dollar Tree shopping list for the next weekend I don't work.}

The first picture also shows the use of wooden platforms as the feet on each side of the closet unit.  I am wondering if this would be worth trying with the workbench/desk.

The pictures on the page appear smaller than they are.  To see them larger, simply double click on the picture.  Also, I always welcome your constructive criticism.  Click on the Comment link below next to the icon of a pencil; it may say "No" or have a number in front of it.

Saturday, June 14, 2014

Calculating the leg risers and supports

Now that I have the measurement calculations, I can determine how long my leg risers need to be.  My legs {consisting of an end cap, a 6-inch pipe, and a T} measure in at 9¼ inches.  The table top is supposed to be 30 inches off the ground.  that means I need to add another 20¾ inches.  If the table top is 1-inch thick, I can subtract that from the length.  Adding a flange at the top provides ¼ inch in length, so I am now down to needing 19½ inches.  The T will use up ½ inch of thread.  The end result is I need 20-inch pipes for my risers.

I can also determine the length of the leg supports.  To do this, I assembled a flange, a 6-inch pipe, and a T.  I set the flanges at 24 inches apart, the depth of my work table.  I then physically measured between the two T intersections and got a fraction that Blogger doesn't like, 17-7/16 inches.  If a sideways T-6-T becomes 9⅞ inches, that means subtracting 3⅞ inches from the outside separation of the Ts will give me pipe length.  The outside separation of the Ts in my flange assemblage measures in at 22 inches, so my pipe length needs to be 18⅛ inches.  I must also consider there is a T in the middle of this pipe. The T itself takes up 2⅞ inches, but I will also need ½ inch of thread to insert into each side the T.  This results in pipes totaling 16¼ inches in length.  There is no plan that states how to divide these 2 pipes.  Therefore, I am going to go with an arbitrary 12¼-inch pipe and a 4-inch pipe.

At this point I have a total of 104¼ inches of custom cut pipe.  If I add the 4-inch pipes, that brings it to 112¼, not counting loss for cutting.  This would be 8 cuts for 7¾ inches of pipe.

Determining the length of the cross bar between the legs goes something like this.  If I set the flanges 24 inches apart, and the outside edges of the Ts is 22 inches apart, and the T on the leg support is centered with the other Ts, then a 48-inch separation {for the length of the desk} results in a 46-inch outside separation of the Ts.  Subtract from that the 3⅞-inch separation factor brings me to 44⅛ inches with no other adjustments that need to be made.

As this would require a second 10-foot pipe to be custom cut, the question of width again reappears.  I can get a 68⅛-inch pipe for the same price as the 44⅛-inch pipe.  Damn.  Decisions, decisions . . .

I always welcome your constructive criticism.  Click on the Comment link below next to the icon of a pencil; it may say "No" or have a number in front of it.

Friday, June 13, 2014

First measurement tests

In order to properly gauge the pipe sizes needed for my new workstation, I have purchased the following pieces of 1-inch interior diameter pipe:
  • 2 floor flanges
  • 2 T intersections
  • 2 6-inch pipes
  • 2 end caps
  • 1 "close"
This set of piping cost me $40.07.  Now, to start piecing them together to get dimensions.
A T intersection for 1-inch pipe is 2⅞ inches from opening to opening and 2⅜ inches from opening to back.
A 6-inch-long piece of 1-inch pipe is actually 6 inches long with an outer diameter of 1⅓ inches and an inner diameter of 1.05 inches.  The threads cover 1 inch on each end of the pipe.
Because of really poor seams in the end cap pieces, the measurements vary from 1⅛-1¼ inches in height and 1⅓-1¾ inches in diameter.  {Note to self:  Learn how to use multiple point focus on your camera!}
This is called a "close."  It is basically all thread.  It measures just short of 1½ inches in length.
Here is the infamous floor flange.  I had to buy it in galvanized steel because Lowe's doesn't have it in black iron.  I checked Google.  Home Depot sells it, but I cannot order it on-line because my local Home Depot does not carry it.  I came across a company called MSC Industrial Supply that has the floor flange for only $7.71.  They also have free shipping on orders over $99.  I checked a few other prices.  MSC's prices are higher, sometimes twice as high, as Lowe's.  The flange is the only difference.  However, the specs on the MSC flange show it to be rated 300 psi, while my pipe is 150 psi.  Also, the promised free shipping at $99 did not materialize.  Even so, the cost per flange by ordering from MSC is only $8.95, compared to $10.79 at Lowe's.

Anyway, the dimensions of the flange are 3⅞ inches in diameter and ¾ inch in height.

Assemblages:
This T-close-T assemblage measures 6½ inches in length.  As each T is 2⅞ inches, 2 Ts make 5¾ inches.  Therefore, a close between two items adds ¾ inch to the length and loses ⅜ inch on each thread.
Adding an end cap to a 6-inch pipe results in a length of 6¾.  An end cap, thus, adds ¾ inch to the length of a pipe, while the pipe itself loses ½ inch of thread length.  This is a larger loss than on the close.
The T-6-T configuration results in an 11-inch length.  This does not compute.  adding the 5¾ to 5, the length should have been 10¾ inches.  Where did the other ¼ inch come from?  Because I want the two T openings facing the same direction, I do not use up the entire thread length on either side of the 6-inch pipe.  In computation, then, how the connectors face will change the total length.  This will make it kind of hard to gauge some pipe lengths.
Based on the above measurements, a sideways T-6 assemblage should come in at 7⅞ inches, and it actually does.  The T ate up ½ inch of the 6-inch pipe.  However, a sideways T-6-sideways T resulted in 9⅞ inches, slightly longer than the mathematically calculated 9¾ inches but not as long as the ¼-inch discrepancy of the T-6-T configuration.  Hence, the difference will change depending on how the connector is facing.
The hardest item to measure is the flange-6.  Dropping a ruler down the inside of the pipe, the measurement comes in at 6¼ inches, meaning a flange will add ¼ inch to the length of a pipe.

From this list of measurements above, I should be able to assemble the feet of the industrial/plumbing pipe desk and calculate the lengths of pipe needed for the cross bars and leg risers.

The pictures on the page appear smaller than they are.  To see them larger, simply double click on the picture.  Also, I always welcome your constructive criticism.  Click on the Comment link below next to the icon of a pencil; it may say “No” or have a number in front of it.

clean black iron pipe

On handling black iron plumbing pipe in my Lowe's, my hands came away very black.  It seems black pipe comes covered in oil to prevent rust during shipping (Williams).  Being a novice at google-fu, I was unable to get much information on de-oiling the pipe.  Most projects that use black iron pipe don't include instructions for cleaning the pipe, and the loft bed project I am using for reference simply says, "after cleaning pipe." Here is what I have found to this point.

Steevo recommends mineral spirits, while bob15 recommends alcohol or parts cleaner.  Most of the other sites were about removing rust, removing the black oxidation, or cleaning meth pipes.  Of these suggestions, I am going to start with alcohol.
This is why you want to clean black iron pipe before using for furniture builds.  Don't want this getting on your sheets or pants, do you?
I chose rubbing alcohol from the local grocer because it is easier to obtain than running to the hardware store.
This is the pipe before cleaning.  I squirted a little rubbing alcohol on a paper towel and cleaned the outside of the pipe.  I did this four times in total.
This resulted in a nicely shiny grey pipe ready to be used to build furniture.  I further discovered that one should also clean the connectors (Ts, flanges, etc.) as well.

The pictures on the page appear smaller than they are.  To see them larger, simply double click on the picture.  Also, I always welcome your constructive criticism.  Click on the Comment link below next to the icon of a pencil; it may say “No” or have a number in front of it.

References:
bob15. "Removing coating from black iron pipe." General Garage Discussion. The Garage Journal, 10 Feb. 2013. Web. 13 June 2014.

Steevo. "Removing coating from black iron pipe." General Garage Discussion. The Garage Journal, 10 Feb. 2013. Web. 13 June 2014.

Williams, Jane. "Black Pipe Vs. Galvanized." eHow. Demand Media, Inc., 21 June 2013. Web. 13 June 2014.

Black vs Galvanized

Some of you may have a question as to what, exactly, are black iron and galvanized steel pipe and what the differences are.  Here is a short primer on the subject.

Black iron and galvanized steel pipes begin life as the same steel tubing, so their internal structure is pretty much the same, down to the interior and exterior dimensions.

Black iron pipe was used primarily for gas lines (Mooney).&nbps; Some say the black is paint (WayneL5), while other contend it is oxidation from forging (Williams).  Of course, that info is from forum posts, so I will not attest to the accuracy.  Galvanized steel is coated with zinc to deter rust (Superpages).  Neither of these pipes should be used for drinking water plumbing.

I always welcome your constructive criticism.  Click on the Comment link below next to the icon of a pencil; it may say “No” or have a number in front of it.

References:
Mooney, Ted. “What is Black Iron?” Hotline/Forum. Finishing.com, n.d. Web. 13 June 2014.

WayneL5. "What *is* black pipe?" General discussion. Fine Homebuilding®, 17 June 2006. Web. 13 June 2014.

"What is Galvanized Pipe." Superpages. Dex Media, n.d. Web. 13 June 2014.

Williams, Jane. "Black Pipe Vs. Galvanized." eHow. Demand Media, Inc., 21 June 2013. Web. 13 June 2014.

Thursday, June 12, 2014

Size still matters

Now that I have the design for my plumbing pipe workbench set, I need to decide how wide to make it.  A small desk is about 48 inches wide and can have drawers but very little leg room.  My current workbench is 72 inches wide, and I kind of like the configuration.  The problem is my small car will not carry a 6'x2' piece of lumber.  My current bench is also in two pieces:  A 2'x4' and a 2'x2', so why not do this with the pipe desk?

That, therefore, is what I have decided to do.  I am going to build a 2'x4' industrial/plumbing pipe desk/workstation with another 2'x2' industrial/plumbing pipe table next to it.

The pictures on the page appear smaller than they are.  To see them larger, simply double click on the picture.  Also, I always welcome your constructive criticism.  Click on the Comment link below next to the icon of a pencil; it may say “No” or have a number in front of it.