Showing posts with label industrial/plumbing pipe shelving. Show all posts

Friday, June 27, 2014

!($&#*#*$&%!*#@!!

Shit.  I don't want 48-inch of separation; I want 48 inches between the flanges.  The flanges add another 2 inches, so I wanted a 46-inch separation, which means the pipe should have been cut at 42 inches.  Crap.  I wonder if they well recut the pipe.

To their credit, Lowe's re-cut all the threads for free.  We tested the threads using 2 connectors {an end cap and a coupling} to make sure they worked this time.  Next time, I am going to test the threads as the pipe is cut so I don't have to make 3 trips!

The pictures on the page appear smaller than they are.  To see them larger, simply double click on the picture.  Also, I always welcome your constructive criticism.  Click on the Comment link below next to the icon of a pencil; it may say "No" or have a number in front of it.

A few tips on custom-cut pipe

1)  Whereas shorter black iron pipe is usually coated with oil, longer sections {anything over 12 inches} are coated with black paint.  The pipes I bought at Lowe's even had information printed on top of the paint.

2)  While cleaning off the printing and the price sticker glue using rubbing alcohol, the black paint also came off.

3)  Having pipe custom cut and threaded will leave sharp burrs on the end of the pipe.  You may wish to have a metal file available to take these down.

4)  Pipe, at least at Lowe's, cannot be threaded in custom sizes less than 12 inches; so I cannot plan on any 11½-inch pipes.  I either use what the store has precut or go for something longer than 12 inches.

I always welcome your constructive criticism.  Click on the Comment link below next to the icon of a pencil; it may say "No" or have a number in front of it.

Floor flange search

Unfortunately, my local Lowe's does not carry black iron floor flanges, which I need for my various projects.  Therefore, I went out to the internet.  Prices vary greatly for some of these items.  I have seen ½-inch floor flanges for under $2 and over $10.  Some of the decision has to come down to certain non-monetary criteria.

While looking at the flanges available through Home Depot's website, a customer complained that he thought he was ordering a specific brand and was instead given a Chinese knockoff.  I have also read some articles on line {so they have to be true, right? :::wink, wink:::} that Chinese flanges have less accurate threads.  Also, my brother, the former gang member, would kill me if the parts weren't made in the U.S.A.  My search took me to a company called MSC Direct.

MSC Direct isn't the least expensive place to get flanges; they are better than some and worse than others.  After shipping costs, however, the price per flange will still be less than what I paid for the galvanized flanges I used in testing.  Their flanges are also made in the U.S.A., so that is a plus.  Finally, they gave me good customer service via email, and I tend to pay more at a company with good customer service.  {That reminds me, I have to switch banks.}

I will be placing a flange order with them later tonight.  This means I am pretty much dedicated to making at least the plumbing pipe furniture that needs the flanges.

I always welcome your constructive criticism.  Click on the Comment link below next to the icon of a pencil; it may say "No" or have a number in front of it.

Thursday, June 26, 2014

Change of heart on shelving

My ideas about plumbing pipe shelving took a turn when I discovered this Instructable.
The creator calls this a “flexy rack.”  The idea is akin to those adjustable wire shelf units, like these.
On the wire units, the shelves can be adjusted up and down the pole depending on where you put the plastic wedge.  With the “flexy rack”, the shelves get adjusted up and down just by turning a nut.  This is possible because the rod is a huge bolt with threads covering the entire surface; that is why it is called an all-thread rod.

This idea pretty much solves all my shelving design problems.  I am going to see if there is an all-thread rod size onto which a plumbing end cap or flange will fit.  Once I have that answered, it will be an easy process of buying rods, nuts, and shelves.

The pictures on the page appear smaller than they are.  To see them larger, simply double click on the picture.  Also, I always welcome your constructive criticism.  Click on the Comment link below next to the icon of a pencil; it may say "No" or have a number in front of it.

Wednesday, June 18, 2014

Failure of measurements

As it turns out, trying to design plumbing pipe furniture using measurements is futile for someone with borderline OCD, like me.  I measure pipes and add them together, but they do not piece together at that measurement.  I try to use Photoshop with the grid turned on, but the errors are even more noticeable.  I am going to have to simply use my best approximations, which I never like doing.  After all, I can always loosen one joint a partial turn to get everything the same length.

I always welcome your constructive criticism.  Click on the Comment link below next to the icon of a pencil; it may say "No" or have a number in front of it.

Thoughts on Kee Klamp fittings

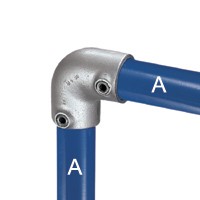
Those of you who have searched the Internet for industrial/plumbing pipe guides may have come across something known as Kee Klamps.  Kee Klamps are pipe fittings that use a presser screw to hold pipes in place rather than a threaded connection.  Maybe the picture below will explain it better.
Instead of a threaded socket, those two Allen-type screws are tightened to hold the pipes in place.  There are two major benefits to this type of connector.  The first is a wider variety of configurations.  One can layer and criss-cross pipes with Kee Klamps in ways that one can't with regular plumbing pipes.  The other advantage is no need for unions.  Whenever a plumbing pipe design forms a closed loop, such as a square or rectangle, a union is needed because one can't screw a pipe in at both ends at the same time.
As you could see if I hadn't drawn over it, this bookshelf is a closed loop and, hence, requires a union.  The hex nut inside the green circle is a union.  A union has 3 different threaded hex nuts.  The 2 on the outsides spin in different directions so pipes can be joined.  The middle hex holds the other 2 pieces in place.  A union is not necessary when using Kee Klamps.

There are two major disadvantages of Kee Klamps that I perceive, the first being that the pipes are held together with just a small screw rather than a large thread path.  This theoretically should have less holding power, although people have built parkour structures using Kee Klamps.  The second drawback is cost.  A 90° elbow of 1-inch threaded pipe costs $3.60 at Lowe's; the same size elbow to buy on-line costs $10.86.  This brings up the inconvenience of on-line ordering versus picking something up locally as well as the potential added cost of shipping.

All these things being said, I am currently not sold on the idea of using Kee Klamps instead of standard plumbing joints.

The pictures on the page appear smaller than they are.  To see them larger, simply double click on the picture.  Also, I always welcome your constructive criticism.  Click on the Comment link below next to the icon of a pencil; it may say "No" or have a number in front of it.

References:
"15 - 90° Elbow." Simplified Building. Simplified Building Concepts, 2010. Web. 18 June 2014.

"Parkour Structure at Miami Freerunning and Parkour Academy." Simplified Building. Simplified Building Concepts, 2010. Web. 18 June 2014.

Sunday, June 15, 2014

New inspirations!

Just came across a few more plumbing pipe designs that I may wish to incorporate into the desk/workbench idea.
I found this on a Pintrest page.  It is described as a closet, but I am thinking about making it a rail system that goes over my workbench.  The legs in the picture background could actually sit on my desktop rather than the floor, and I can set up the shelves in the picture foreground as the additional 2 feet of desktop space.  I can even employ this idea . . .
. . . {also from a Pintrest page} as a steampunk/industrial file cabinet system.  I would hang folders instead of record covers.  {Just put metal skirt hangers on my Dollar Tree shopping list for the next weekend I don't work.}

The first picture also shows the use of wooden platforms as the feet on each side of the closet unit.  I am wondering if this would be worth trying with the workbench/desk.

The pictures on the page appear smaller than they are.  To see them larger, simply double click on the picture.  Also, I always welcome your constructive criticism.  Click on the Comment link below next to the icon of a pencil; it may say "No" or have a number in front of it.

Friday, June 13, 2014

clean black iron pipe

On handling black iron plumbing pipe in my Lowe's, my hands came away very black.  It seems black pipe comes covered in oil to prevent rust during shipping (Williams).  Being a novice at google-fu, I was unable to get much information on de-oiling the pipe.  Most projects that use black iron pipe don't include instructions for cleaning the pipe, and the loft bed project I am using for reference simply says, "after cleaning pipe." Here is what I have found to this point.

Steevo recommends mineral spirits, while bob15 recommends alcohol or parts cleaner.  Most of the other sites were about removing rust, removing the black oxidation, or cleaning meth pipes.  Of these suggestions, I am going to start with alcohol.
This is why you want to clean black iron pipe before using for furniture builds.  Don't want this getting on your sheets or pants, do you?
I chose rubbing alcohol from the local grocer because it is easier to obtain than running to the hardware store.
This is the pipe before cleaning.  I squirted a little rubbing alcohol on a paper towel and cleaned the outside of the pipe.  I did this four times in total.
This resulted in a nicely shiny grey pipe ready to be used to build furniture.  I further discovered that one should also clean the connectors (Ts, flanges, etc.) as well.

The pictures on the page appear smaller than they are.  To see them larger, simply double click on the picture.  Also, I always welcome your constructive criticism.  Click on the Comment link below next to the icon of a pencil; it may say “No” or have a number in front of it.

References:
bob15. "Removing coating from black iron pipe." General Garage Discussion. The Garage Journal, 10 Feb. 2013. Web. 13 June 2014.

Steevo. "Removing coating from black iron pipe." General Garage Discussion. The Garage Journal, 10 Feb. 2013. Web. 13 June 2014.

Williams, Jane. "Black Pipe Vs. Galvanized." eHow. Demand Media, Inc., 21 June 2013. Web. 13 June 2014.

Black vs Galvanized

Some of you may have a question as to what, exactly, are black iron and galvanized steel pipe and what the differences are.  Here is a short primer on the subject.

Black iron and galvanized steel pipes begin life as the same steel tubing, so their internal structure is pretty much the same, down to the interior and exterior dimensions.

Black iron pipe was used primarily for gas lines (Mooney).&nbps; Some say the black is paint (WayneL5), while other contend it is oxidation from forging (Williams).  Of course, that info is from forum posts, so I will not attest to the accuracy.  Galvanized steel is coated with zinc to deter rust (Superpages).  Neither of these pipes should be used for drinking water plumbing.

I always welcome your constructive criticism.  Click on the Comment link below next to the icon of a pencil; it may say “No” or have a number in front of it.

References:
Mooney, Ted. “What is Black Iron?” Hotline/Forum. Finishing.com, n.d. Web. 13 June 2014.

WayneL5. "What *is* black pipe?" General discussion. Fine Homebuilding®, 17 June 2006. Web. 13 June 2014.

"What is Galvanized Pipe." Superpages. Dex Media, n.d. Web. 13 June 2014.

Williams, Jane. "Black Pipe Vs. Galvanized." eHow. Demand Media, Inc., 21 June 2013. Web. 13 June 2014.

Monday, June 9, 2014

Cost-benefit analysis, part #2

Based solely on the plans pictured in previous posts, here is a list of what I need just for the bottom shelf:
  • 4 flanges @ $10.55 each
  • 8 1½-inch pipes are not available
    (substituting 2-inch pipes @ $1.42 each)
  • 6 T intersections @ $3.89 each
  • 2 12-inch pipes @ $5.02 each
  • 1 24-inch pipe @ $11.86
  • 1 24-inch wooden shelf @ $11.05
Adding all this up comes to $109.85 just for the base.  Each additional shelf requires 2 T intersections, 2 12-inch pipes, 1 24-inch wooden shelf, and another two pipes of undetermined length.  Each additional shelf will cost $38.91 maximum.  The unit is 6 shelves in height, so the maximum cost to this point is $304.40.  There are also 2 cross beams in the back, each requiring 2 T intersections and a 24-inch pipe.  This adds another $19.64.  However, each of these may also need a union, which is $8.81.  Applying sales tax and my Lowe's discount, the total to build this unit comes to $352.59.

Now that I know the price for building this unit, I need to determine the other costs.  I will be spending time constructing the shelving.  I will be spending time and gas to go to Lowe's to get the pieces.  There is also the possibility that the unit will not work.

The benefits include having a unique piece of furniture, being able to take it apart and transport in my small car, and creating the piece to use space more efficiently than a pre-made piece.

At this point, I would say the costs outweigh the benefits.  Therefore, I need to either decrease the costs or increase the benefits.  One way to decrease the costs is to have Lowe's cut longer pipes into smaller pieces, which is a service my Lowe's offers for free.  For example, I could buy a 48-inch pipe for $17.39 and have them cut it into 2 24-inch pipes, which would have cost $23.72.  This would save me $6.53.  Lowe's sells 120-inch pipe for $19.76.  This could be cut into 5 24-inch pieces, which would have cost $59.30.  The savings here is $39.54.  I would hate to do it, but if they are willing to cut a 120-inch pipe into 10 12-inch pieces, that would result in a savings of $30.44.  Approximate total savings at this point would be $72.22, making the project ≈$279.77.  there is another potential savings of $30 by using all 12-inch pipes for the risers, but that would remove one of the benefits:  more efficient use of space.

A second option would be to use ¾-inch diameter pipe instead of 1-inch diameter, as called for in the original plans.  Checking all my other pipe furniture plans, they all call for a minimum of 1-inch diameter pipe.

A third idea would be to replace the flanges with end caps.  I didn't check the price of end caps, so I cannot say at this time how much of a savings that would be.

Even with lowering the price, the costs still outweigh the benefits.  What I need to do next for this to be a true cost-benefit analysis is see if there is a shelving unit on the market that costs less than $280 that will satisfy my listed benefits.  This will probably have to wait until Saturday or may next day off of work.

I always welcome your constructive criticism.  Click on the Comment link below next to the icon of a pencil; it may say “No” or have a number in front of it.

What is wrong with this picture?

This picture is my inspiration for a set of shelves.  After some head scratching, however, I have discovered there is something wrong with the design presented.  The back of the unit uses pipes 24 inches long, and the shelves themselves are 24 inches long.  Unfortunately, the designer does not take into account the addition of the T joints.  When one connects T joints, one has to account for their width in the separation of the supports as well as the loss of thread length on the pipe itself.  For example, if ¾-inch diameter pipe is used, this will add approximately 3 inches to the measurement.  The 24-inch long pipe with a T on each end is now 27 inches long.  This creates a gap between the supports of 25 inches, so the supports are too far apart to actually hold a 24-inch shelf, as pictured in the diagram.  The simple answer, then, is to use 18-inch long pipe for the back of the unit instead of 24-inch.

Further, this diagram does not make clear what diameter of pipe is to be used*.  Black pipe, which is part of the diagram's name, comes in many diameters.  I suppose I will have to see what my hardware store carries in the parts I need to decide which diameter to use.  My fear is still that the unit, as designed, will bow downward from the top due to all the joints.  I am going to have to buy proper pipe tightening tools to make sure the joints are as secure as possible; I am also going to continue the cost-benefit analysis before buying anything.

The pictures on the page appear smaller than they are.  To see them larger, simply double click on the picture.  Also, I always welcome your constructive criticism.  Click on the Comment link below next to the icon of a pencil; it may say “No” or have a number in front of it.

*I stand partially corrected on the diameter point.  While the diagram itself does not indicate pipe diameter, the information on the designer's upload page indicates this is to be 1-inch diameter pipe.

References:
J., Jamar. "Black Pipe shelve." SketchUp 3D Warehouse. Trimble Navigation Limited, 26 Mar. 2014. Web. 9 June 2014.

Sunday, June 8, 2014

Cost-benefit analysis, part #1

In an effort to begin the cost-benefit analysis of the industrial pipe shelving unit, I went out to the Lowe's website.  Unfortunately, they only list 8 straight pipes and none of the connectors.  I will have to make a trip to Lowe's to get my first price list.  I will then continue the cost-benefit analysis from there.

The pictures on the page appear smaller than they are.  To see them larger, simply double click on the picture.  Also, I always welcome your constructive criticism.  Click on the Comment link below next to the icon of a pencil; it may say “No” or have a number in front of it.
Practice makes furniture

While searching for plumbing libraries in the Sketchup 3D design software, I came across a black pipe shelving unit, pictured below.
It is an interesting unit with floating shelf design.  I am wondering if plumbing pipe is strong enough to hold the float.  However, this does give me an opportunity to test a few things, such as the need to use union couplers when completing a square.  Also, the design is very flexible.  I can make the bottom shelf, fill it with stuff, and then add another shelf above.  As I stack I can create front support if the tower begins to sag.

I am concerned about two things:  The fact that the shelves are 2x12s, and the potential cost.  2x12s are pretty thick and heavy.  This might be more support than is needed.  As for the cost, I can buy a set of shelves for $40 at the Big Lots.  Will the higher price tag of these shelves meet cost-benefit analysis?  Another thing I just realized the design does not state is what thickness of pipe to use.

As I am currently is a period of overtime at work, I may not be able to get to this project any time soon.

The pictures on the page appear smaller than they are.  To see them larger, simply double click on the picture.  Also, I always welcome your constructive criticism.  Click on the Comment link below next to the icon of a pencil; it may say “No” or have a number in front of it.